What is an Admin Panel?
Lets first see what actually is an admin panel for your web application. Admin panel is a section of your application which is in control of yours. Your visitors and any other person who is not authorized is not able to access your application’s admin panel.
However, if you grant access using credentials then that user will able to login to your admin panel and can modify the website’s data.
So let’s start creating a Cakephp 3 admin panel for our application.
In previous tutorials, we have already seen how to make Cakephp 3 login functionality and Cakephp 3 authentication and authorization of a user.
Here we will use same functionalities but to create the separate Cakephp 3 admin panel.
Now let’s see the steps required to create a Cakephp 3 admin panel.
Don’t worry if you don’t get the steps at first. I will example them in details as you read through in this Cakephp admin login example.
- First, create a separate “admins” database table to store your admin users credential data.
- Baking AdminsController using Cakephp 3 bake command line.
- Bake or create Admin model without prefix, using Cakephp 3 bake command line.
- Bake Admin template files using cakephp 3 command line.
- Set routing prefix for admin in config/routes.php file.
- Add Auth component in AppController.
- Adding beforeFilter and isAuthorized methods in AppController.
- Adding login, logout and beforeFilter methods in AdminsController.
- Adding the setPassword method in Admin Entity file.
- Create a login template for admins.
- Bake all your other application controllers and templates for admin routing using cakephp bake command.
Don’t get afraid of looking into the steps described above. We will see these steps in details and these are very simple and basic steps to follow.
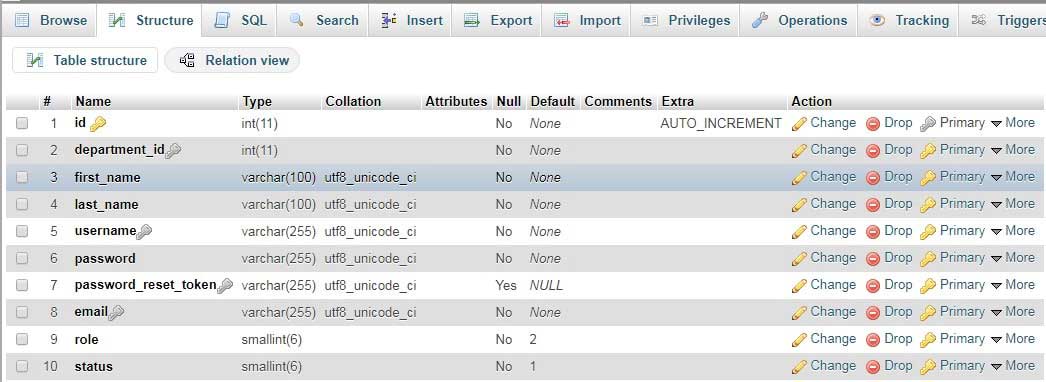
Step 1: Creating the “admins” database table.
For Cakephp 3 admin panel I have created separate “admin” database table to store admins credential data with the following fields=> id, first_name, last_name, username, password, password_reset_token, email, role, status, created, modified.
You can add or remove the fields as per your requirements. But few fields like id, email, password are required for this tutorial and I will recommend to also keep a role field in admin table.
Please see below image for fields details and their datatypes.
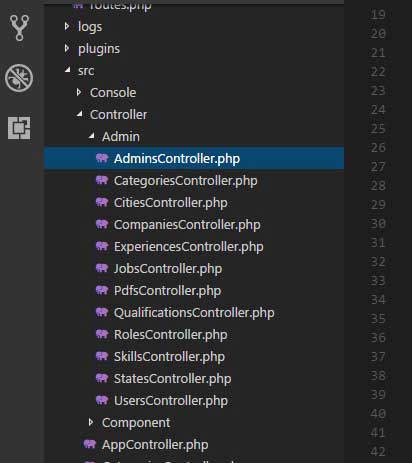
Step 2: Bake AdminsController using Cakephp command-line tool or cake bake tool.
In order to have a separate admin panel, we have to actually create separate MVC for our Admin. So first create a separate AdminsController. This AdminsController will be created in src/Controller/Admin folder, as because of using prefix routing while backing.
Prefix routing and separate admin folder structure will give us clean and maintainable file structure and clean code to use.
To bake AdminsController first go to command prompt and enter a path to your application.
Next use the bake command –
bincake bake controller –prefix admin admins

As you see in the above command we have used “–prefix admin”. This will create an “Admin” folder in src/Controller path and in the Admin folder, AdminsController.php will get created. In the above command, last “admins” tells the bake control to create a controller for an admins database table.
Here prefix meaning, I want to use my admin panel using URL with admin prefixed.
Like for an example, I want to access CitiesController’s add action from a URL for an admin panel, then the URL will be
localhost://cakephpapp/admin/cities/add
So all the controllers can be accessed using admin prefix for an admin panel.
Step 3: Bake admin model without prefix.
Next, we have to bake an Admin model. In Cakephp 3, model consists of two files first are Entity file and second is Table file. We can create both the files using cake bake command as follows.
Use bake command for an admin model.
bincake bake model admins
We have not used the prefix for a model class, as it is not required to keep a model in separate prefixed folder structure because these files are never exposed to the users.
Above bake command will create two files – Admin.php in Model/Entity and AdminsTable.php file in Model/Table folder structure.

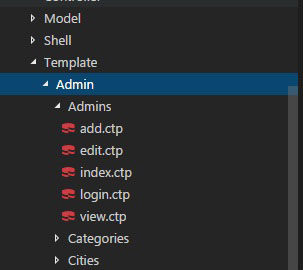
Step 4: Bake Admin template using bake command
Next step is to create template files for a basic CRUD generated in AdminsController.php using a bake command –
bincake bake template –prefix admin admins
This command will create an “Admin” folder for the admins database table. And in “Admin” folder another “Admins” folder with CRUD template files will be created.
Step 5: Set routing prefix for admin in config/routes.php file.
In order to use separate URL for our Cakephp 3 admin panel, we have to define route rules. We have created all controller and template files in admin prefix structure. Also if we want to have separate admin URL we have to define prefix routing in routes.php file.
Go to config/routes.php file and add code for admin prefix routing.
Router::prefix('admin', function ($routes) { // All routes here will be prefixed with `/admin` // And have the prefix => admin route element added. $routes->fallbacks(DashedRoute::class); });
Step 6: Adding the Auth component in AppController.
public function initialize()
{
    parent::initialize();

    $this->loadComponent('RequestHandler');
    $this->loadComponent('Flash');
    $this->loadComponent('Auth');

}
Step 7: Adding beforeFilter and isAuthorized methods in AppController.
public function beforeFilter(Event $event)
    {
        parent::beforeFilter($event);

        $this->Auth->allow('display');

        if ($this->request->prefix == 'admin')
        {
            $this->viewBuilder()->layout('admin');

            $this->Auth->config([
                'authenticate' => [
                    'Form' => [
                        'userModel' => 'Admins',
      'fields' => ['username' => 'email']
                    ],
                ],
                'loginAction' => [
                    'controller' => 'Admins',
                    'action' => 'login'
                ],
                'loginRedirect' => [
                    'controller' => 'Jobs',
                    'action' => 'index'
                ],
                'logoutRedirect' => [
                    'controller' => 'Admins',
                    'action' => 'login',
                ],
                'storage' => [
                    'className' => 'Session',
                    'key' => 'Auth.Admin',
                ],
                //'unauthorizedRedirect' => $this->referer(),
                'unauthorizedRedirect' => false,
                'authorize' => ['Controller'],
            ]);


        }
        else
        {
            //Add Auth config for users
        }
    }
'authenticate' => [
                    'Form' => [
                        'userModel' => 'Admins',
          'fields' => ['username' => 'email']
                    ],
                ],
indicates application should use Admins database table and a model to verify admin credentials. We have set “userModel” to “Admins” for this purpose. And set “email” field as default username field. So that while login username will be checked as email using email field.
'storage' => [
                'className' => 'Session',
                'key' => 'Auth.Admin',
             ],
Here storage array tells to use separate Session for admin login so that we can access both users and admins sessions on the same browser.
public function isAuthorized($user = null)
    {
        //Any registered user can accesss public functions
        if(empty($this->request->params['prefix']))
        {

            return true;
        }

        //Only admins can access admin functions
        if($this->request->params['prefix'] === 'admin')
        {

            if(($user['role'] == 2) && ($user['status'] == 1))
            {
                return true;
            }
            return false;
        }

        //Default deny
        return false;
    }
Step 9: Adding the setPassword method in Admin Entity file.
protected function _setPassword($password)
{
    if (strlen($password) > 0) {
       return (newDefaultPasswordHasher)->hash($password);
    }
}
Step 10: Create login template for admins.
<div class="admins form">
    <?= $this->Flash->render('auth') ?>
    <?=$this->Form->create() ?>
    <fieldset>
        <legend><?=__('Please enter your username and password') ?></legend>
        <!--<?=$this->Form->input('username') ?>-->
        <?=$this->Form->input('email') ?>
        <?=$this->Form->input('password') ?>
    </fieldset>
    <?=$this->Form->button(__('Login')); ?>
    <?=$this->Form->end() ?>
</div>
As you see we have use “email” as a form input instead of username – <?=$this->Form->input(’email’) ?>. This will make application to check for email while admin login.
public function login()
{
    if ($this->request->is('post')) {
        $user = $this->Auth->identify();
        if ($user) {
            $this->Auth->setUser($user);
            return $this->redirect($this->Auth->redirectUrl());
        }
        $this->Flash->error(__('Invalid username or password.'));
    }
}

public function logout() {
    return $this->redirect($this->Auth->logout());
}
Step 11: Bake all your other application controllers and templates for admin routing using CakePHP bake command.
public function beforeFilter(Event $event)
{
    parent::beforeFilter($event);
    $this->Auth->allow('add');
}
Kindly help , based on your instruction in version 3.8 when i type the following in url I get this
Error: The layout file AdminLayoutadmin.ctp can not be found or does not exist.
Also I have to change login.php to login.ctp